Dongfeng Gu
Install Jisti-Meet on ubuntu 16.04 with AWS EC2
- 1 minCreate an EC2 instance on AWS

Security groups setting
- Go to the EC2 portal of AWS
- Navigate to the
Security GroupsinsideNETWORK & SECURITY - Select the corresponding security group and click
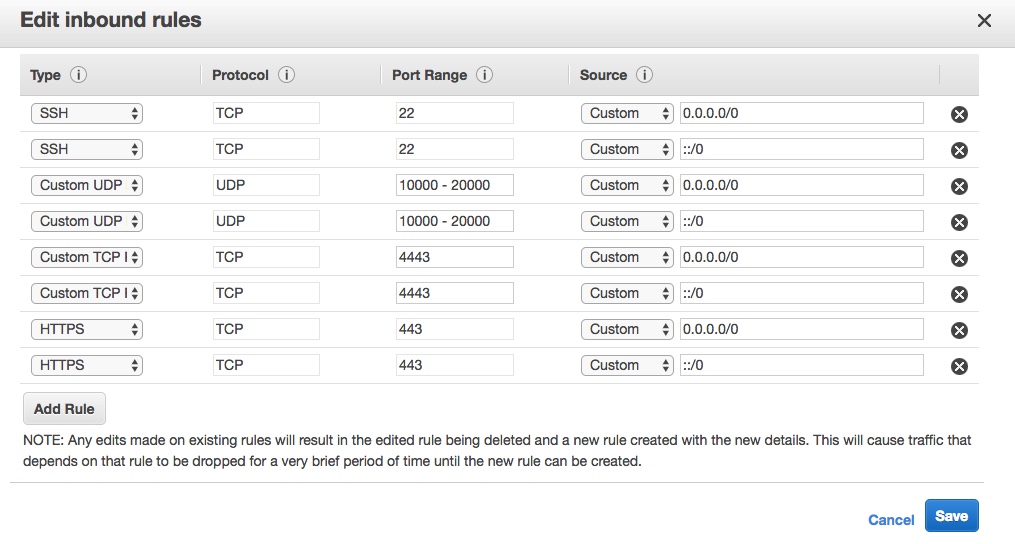
Actions -> Edit inbound rules - Add the
TCP 443,TCP 4443, andUDP 10000-2000ports to the rules like the following 
- (Option) Link your domain to the EC2 instance
- Naviate to the
Elastic IPsinsideNETWORK & SECURITY - Choose
Allocate new address - Selecet the elastic ip that you just create and right click to
associate address - Choose
Instanceand select your instance and private ip - Add a new DNS record on you domain point to the new
Elastic IP(ex: xx.xx.xx.xx)
- Naviate to the
Install the Jitsi Meet
A. Use ssh to login the EC2 instance that you just created
http://docs.aws.amazon.com/AWSEC2/latest/UserGuide/AccessingInstancesLinux.html
B. Step to install the Jitsi Meet
Follow the instruction on Jitsi Meet quick install guide or just type the following
sudo su
echo 'deb https://download.jitsi.org stable/' >> /etc/apt/sources.list.d/jitsi-stable.list
wget -qO -  https://download.jitsi.org/jitsi-key.gpg.key | apt-key add -
apt-get update
apt-get -y install jitsi-meet
Note: During installation, you will have to input your hostname and choose the way to installing ssl cerificate. For your hostname, if you link your domain in the previous step 6, enter your domain name (ex: talk.gdf.name). Otherwise, enter the public DNS of your EC2 instance or just the IPv4 public IP address. For ssl cerification,if you know nothing about this, just select the self cerfication option.
C. (Option) Certificate you self-signed SSL
- Download the file to your EC2 instance
- Add execution permission to this file by
sudo chmod +x install-letsencrypt-cert.sh - Run the file
./install-letsencrypt-cert.sh